⚙️ Exercise 2.1: Ingest Knowledge Using the API
🎯 Exercise Overview
Go beyond manual upload! In this exercise, you'll use a ready-to-use API to automatically ingest Jira issues into your Dify knowledge base. Instead of one big text file, each issue becomes its own document, tagged with metadata such as its issue_key. The same approach works for bulk uploads and scheduled pipelines at work.
✨ This is the foundation for automated knowledge ingestion. Perfect for teams that want to integrate Jira data into their AI assistants!
🚀 What You'll Build
- Connect to the deployed Jira ingestion API
- Explore available Jira projects using Swagger UI
- Ingest structured Jira issues into your Dify knowledge base, in a basic and an advanced mode
- Improve retrieval with Summary Index and hybrid search
- Compare manual vs. API-based ingestion results
📋 Step-by-Step Checklist
🎯 Exercise Checklist
⏱️ Estimated Time: 20-25 minutes | 🎯 Goal: API-ingested knowledge base with structured metadata and measured retrieval
🛠️ Step 1: Get Your Dify Configuration
📋 Configuration Steps
You'll need your Dify instance details to connect the API. Follow these steps:
1.1: Access Your Dify API Settings
In your Dify instance, navigate to Knowledge section
Find and copy your API Server URL
Click the API Key button and create a dedicated, short-lived key for this ingestion
Credential safety: Use this key only for the workshop ingestion, never include it in screenshots or saved command files, and revoke it after the verification steps below.
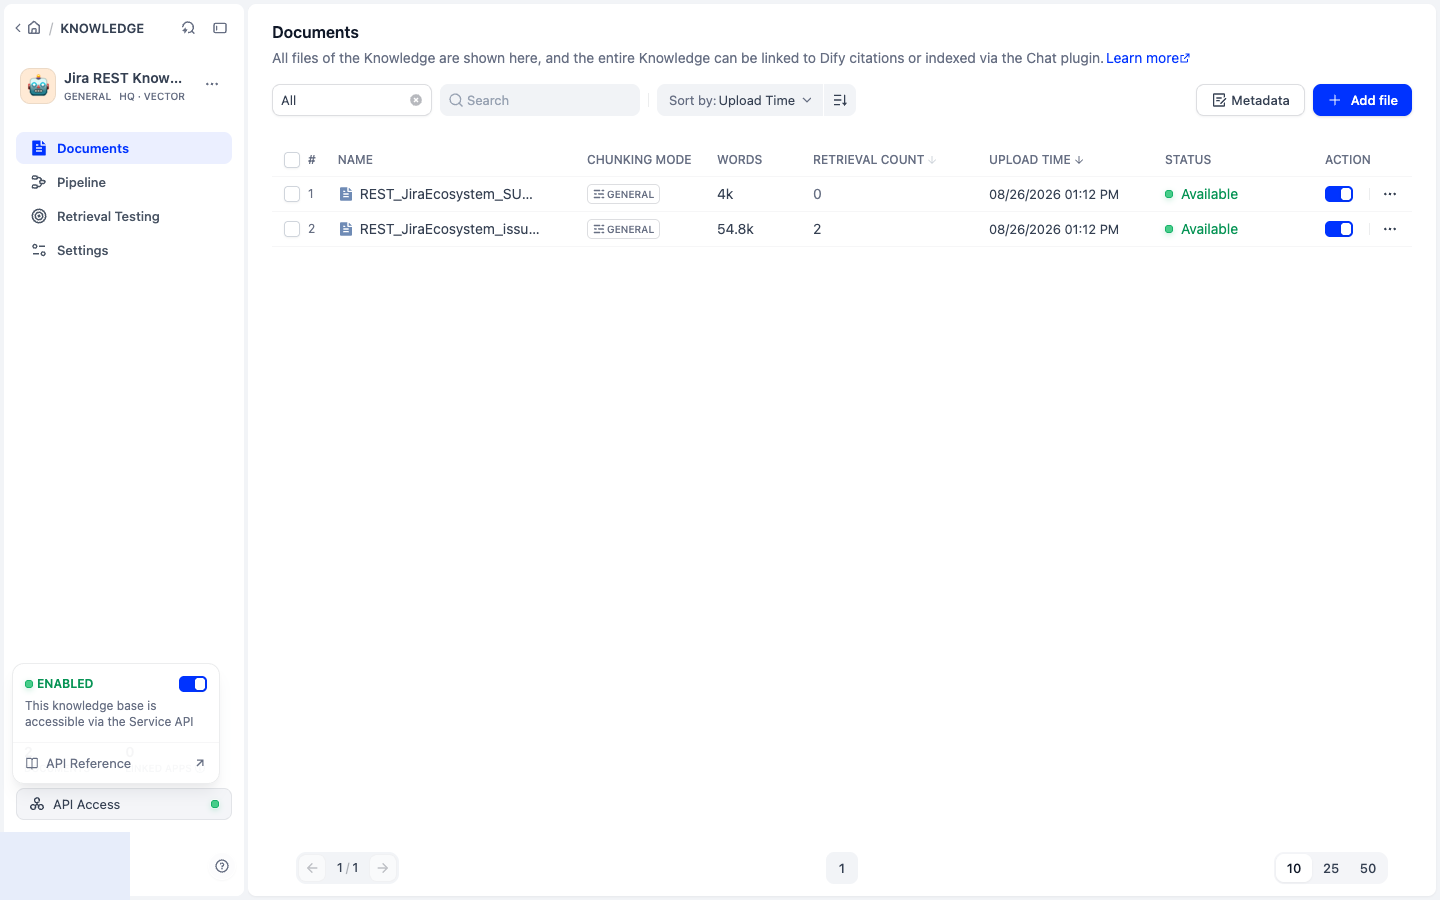
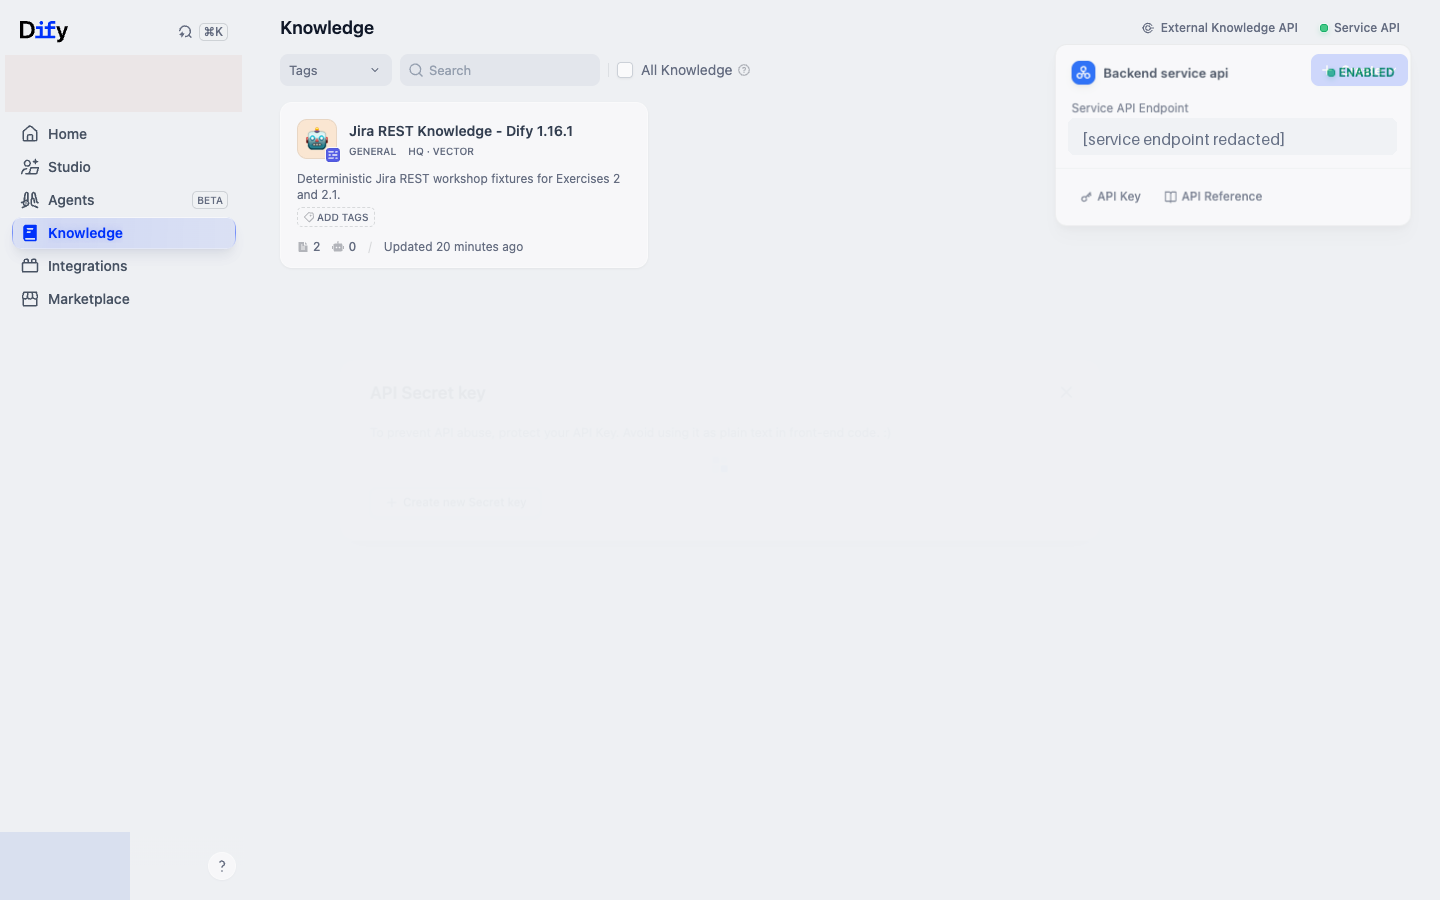
🧠 Pro Tip: Keep your API Server URL and API key handy - you'll need them in the next steps!
🔍 Step 2: Explore Available Projects
Before sending any Dify credentials, check that the service is up: open /health (it should respond OK) and /projects (it should list REST_JiraEcosystem_issues).
📋 Exploration Steps
Before ingesting data, let's see what Jira projects are available using the interactive Swagger UI.
2.1: Open the API Documentation
📚 Interactive API Documentation
Explore available Jira projects and test API endpoints directly in your browser
🔗 Open Swagger UI →
The Swagger UI provides an interactive interface where you can:
- 📖 Browse all available endpoints
- 🧪 Test API calls directly in your browser
- 👀 See request/response examples
- 🔍 View available projects interactively
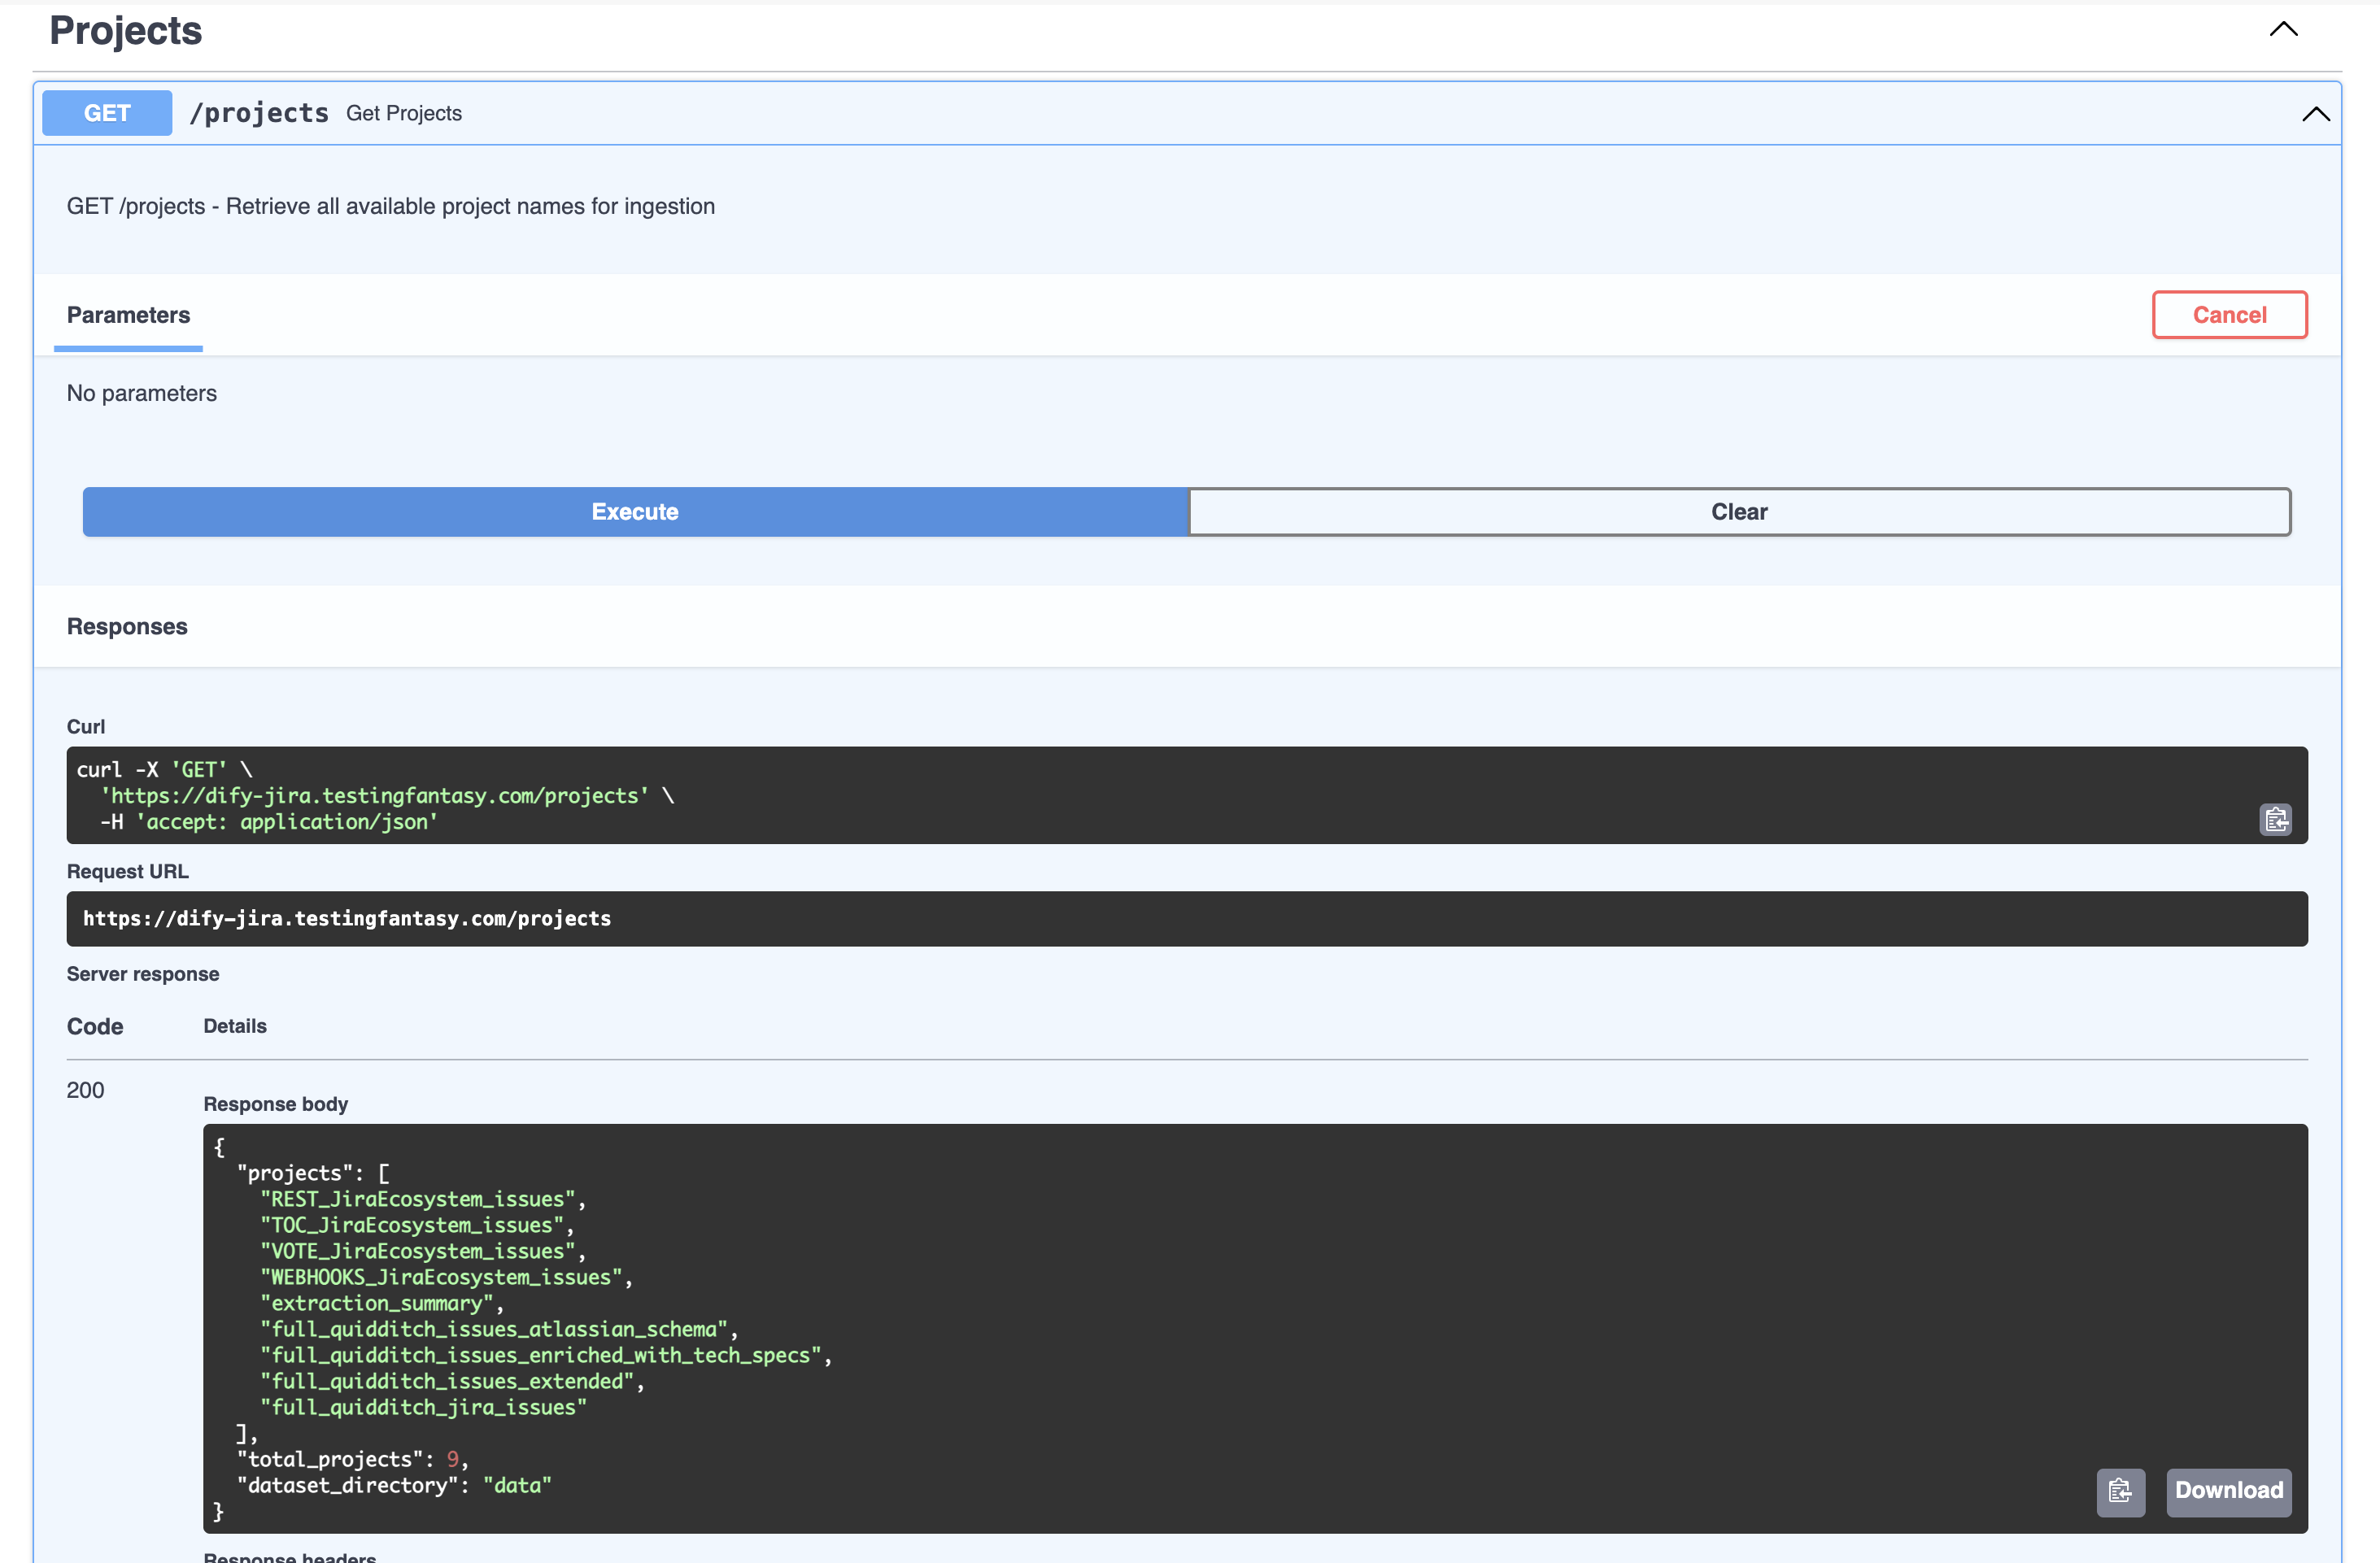
💡 Tip: The Swagger UI is especially helpful if you're new to APIs. You can click "Try it out" on any endpoint to test it without writing curl commands!
📤 Step 3: Ingest Jira Issues
🔧 Ingestion Steps
Use the POST /jira/ingest endpoint to ingest specific projects. Leave the dataset_id empty and fill in your Dify configuration.
3.1: Using Command Line (curl)
Run this command to ingest a project:
curl -X 'POST' \
  'https://dify-jira.testingfantasy.com/jira/ingest?advanced_ingestion=false' \
  -H 'accept: application/json' \
  -H 'Content-Type: application/json' \
  -d '{
  "request": {
    "project": "REST_JiraEcosystem_issues"
  },
  "dify_config": {
    "dify_base_url": "{your_dify_base_url}/v1",
    "dify_api_key": "{your_dify_api_key}",
    "dataset_id": ""
  }
}'
{your_dify_base_url}→ Your Dify instance base URL (from Step 1){your_dify_api_key}→ Your Dify API key (from Step 1)REST_JiraEcosystem_issues→ The project you want to ingest (use/projectsendpoint to see all available projects)
3.2: Using Swagger UI (Recommended)
You can also use the Swagger UI to test the endpoint interactively:
- Navigate to the POST /jira/ingest endpoint in Swagger UI
- Click "Try it out"
- Use this payload:
{
  "request": {
    "project": "REST_JiraEcosystem_issues"
  },
  "dify_config": {
    "dify_base_url": "{your_dify_base_url}/v1",
    "dify_api_key": "{your_dify_api_key}",
    "dataset_id": ""
  }
}
- Click "Execute" to run the ingestion
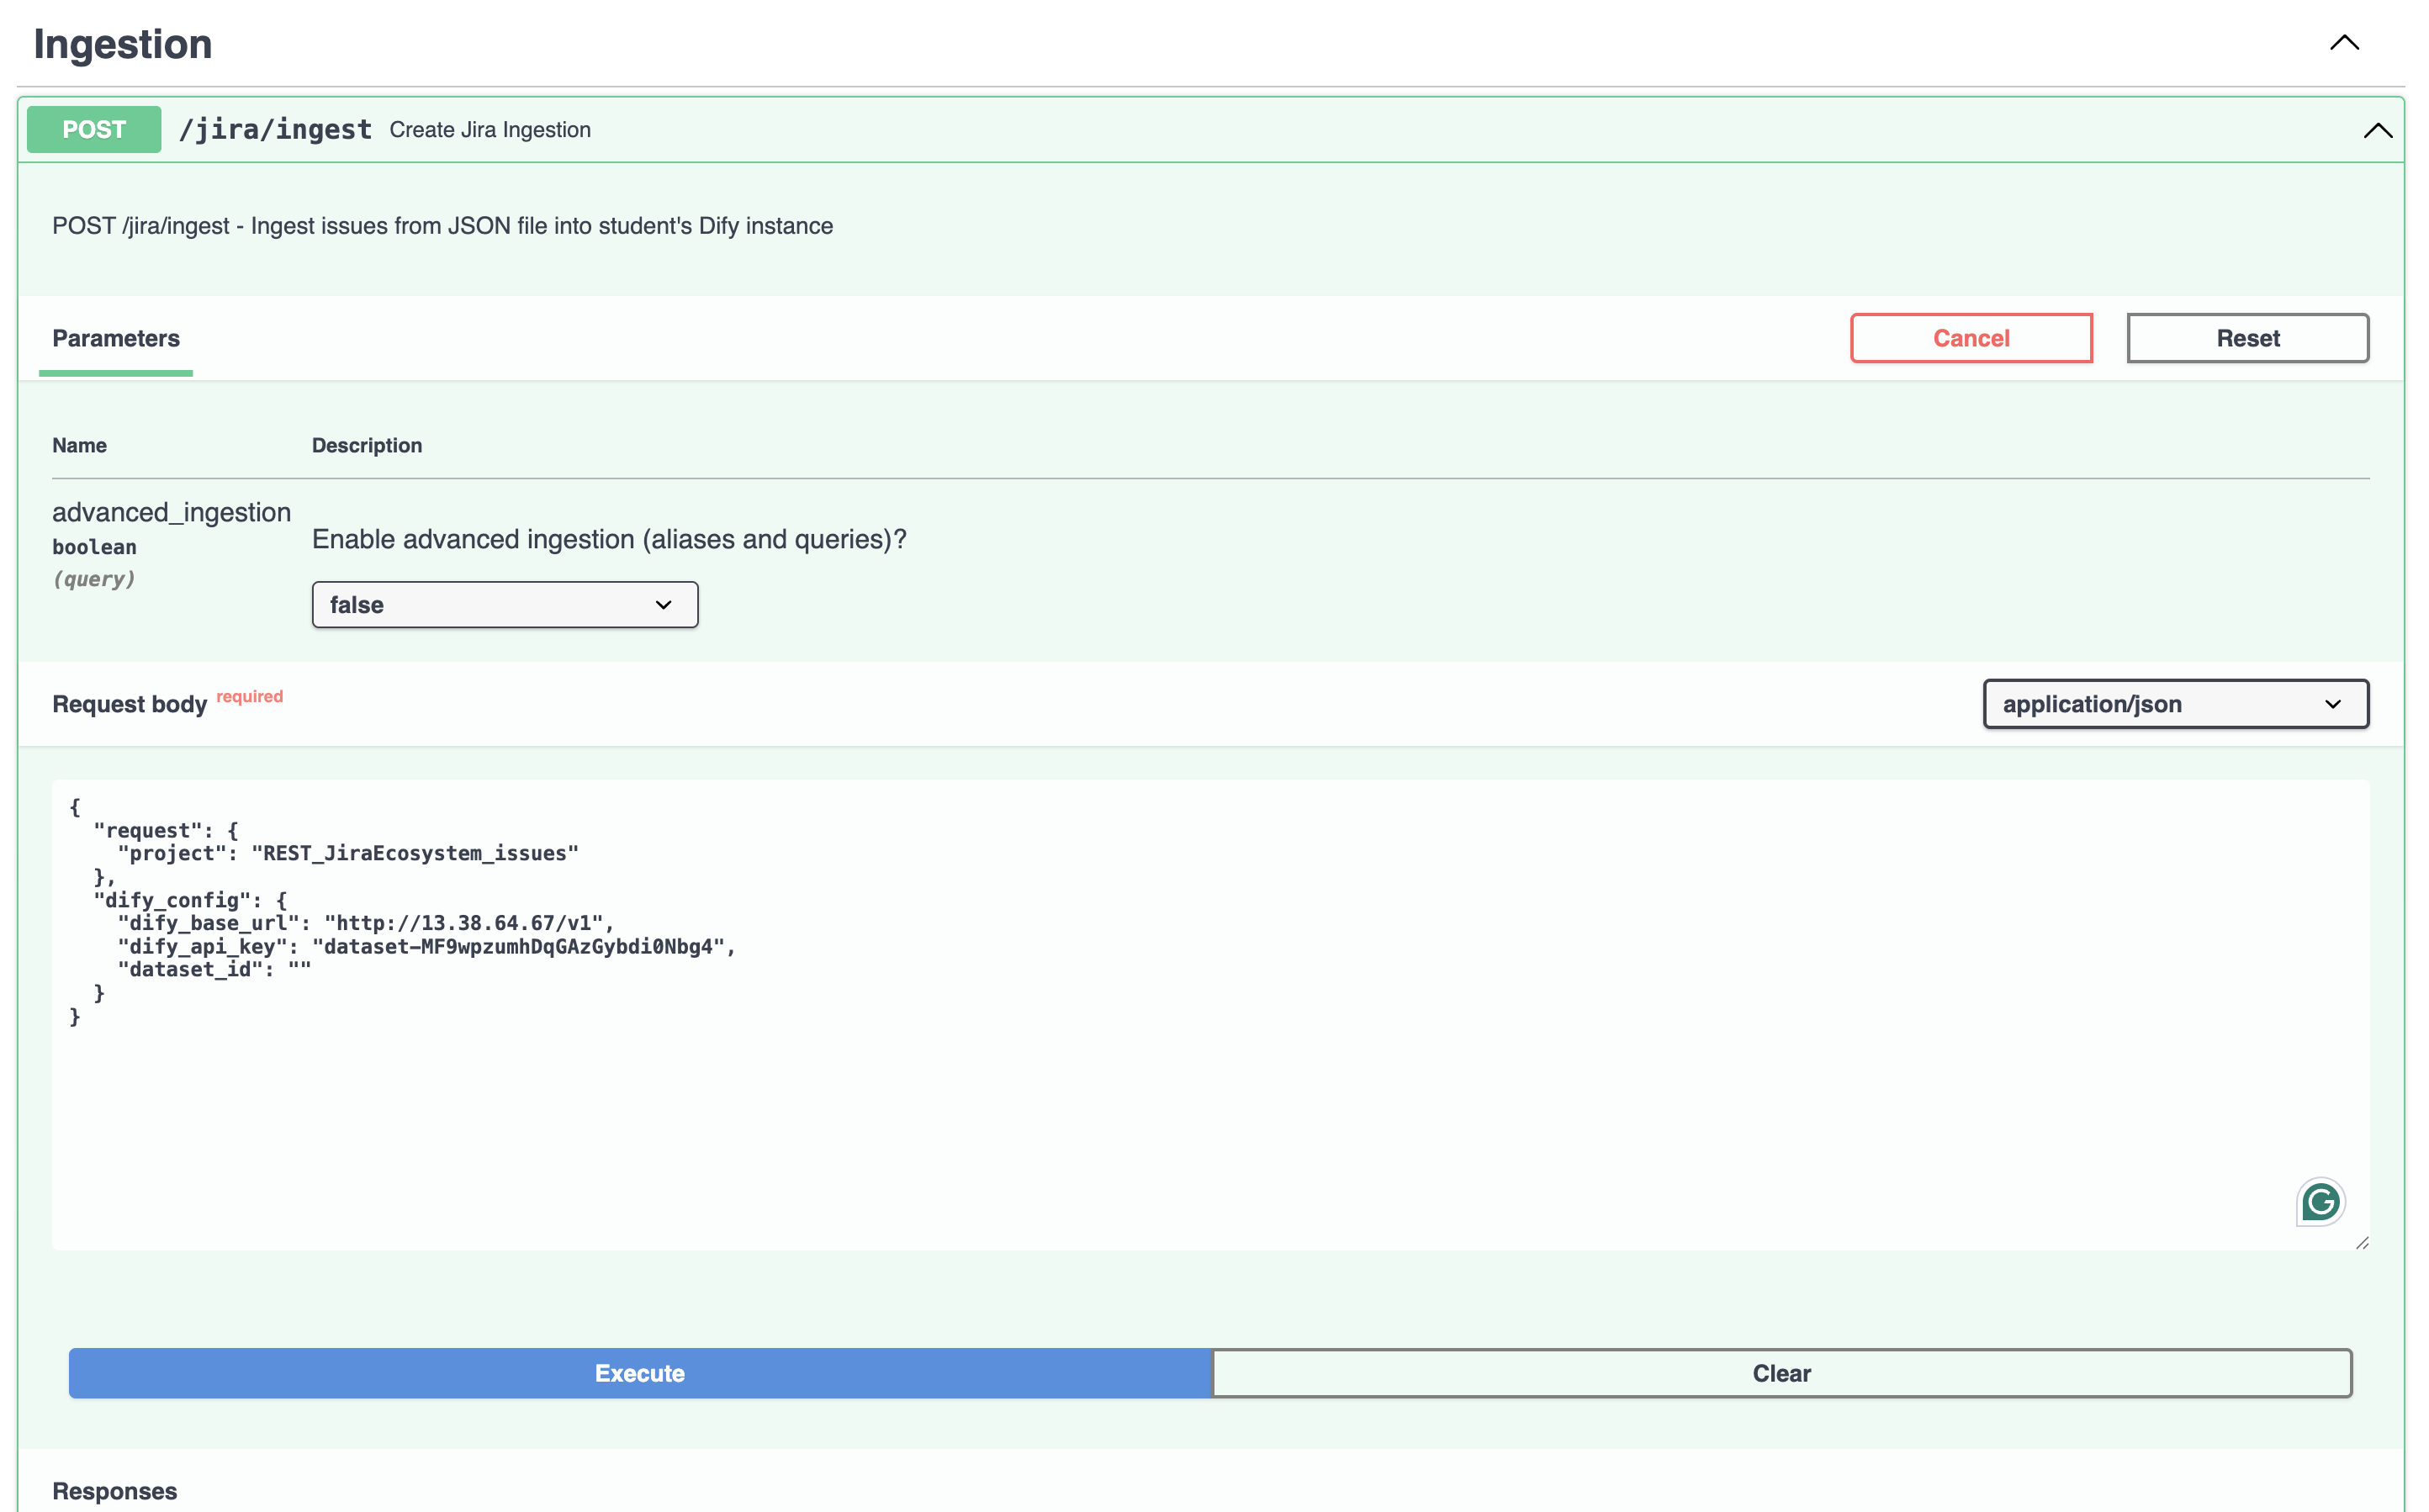
3.3: Run the Advanced Ingestion
Run the same request a second time, now with advanced_ingestion=true. This creates a second knowledge base, Jira_API_Advanced_*, so you can compare the two in Step 7.
curl -X 'POST' \
  'https://dify-jira.testingfantasy.com/jira/ingest?advanced_ingestion=true' \
  -H 'accept: application/json' \
  -H 'Content-Type: application/json' \
  -d '{
  "request": {
    "project": "REST_JiraEcosystem_issues"
  },
  "dify_config": {
    "dify_base_url": "{your_dify_base_url}/v1",
    "dify_api_key": "{your_dify_api_key}",
    "dataset_id": ""
  }
}'
In Swagger UI, set advanced_ingestion to true and execute the same payload.
What's different? Advanced ingestion enriches every issue document before it's indexed:
- Aliases: the other ways people refer to the issue, such as
REST-266,Issue REST-266, andJira REST-266. - Example queries: questions a user might ask about the issue. They give the retriever more wording to match against.
This is called query seeding. It helps when the user's question doesn't use the same words as the Jira issue.
✅ Step 4: Verify Ingestion in Dify
🔍 Verification Steps
After running the ingestion command, verify that your data was successfully uploaded to Dify.
4.1: Check the API Response
The API will return a response showing the ingestion status:
{
  "success": true,
  "dify_instance": "{your_dify_base_url}/v1",
  "files_processed": 1,
  "files_failed": 0,
  "results": [
    {
      "file": "REST_JiraEcosystem_issues",
      "result": ["... Dify document and metadata responses ..."],
      "issues_ingested": 23
    }
  ],
  "errors": []
}
Treat the request as successful only when success is true, files_processed is 1, files_failed is 0, and errors is empty.
4.2: Verify in Dify Knowledge Base
Navigate to your Dify instance and check the Knowledge section. You should see your two new knowledge bases, Jira_API_Basic_* and Jira_API_Advanced_*.
Confirm that:
- both knowledge bases exist and all 23 documents in each show Available;
- built-in metadata is enabled and the custom
issue_keyfield is attached to issue documents; and - the descriptive smoke query
REST-266 Default Jackson configuration unknown propertiesreturns REST-266 at rank 1.
Indexing continues in Dify after the API responds, so check the documents in Dify, not just the API response. Every run creates a new knowledge base: don't repeat a call unless you want another copy.
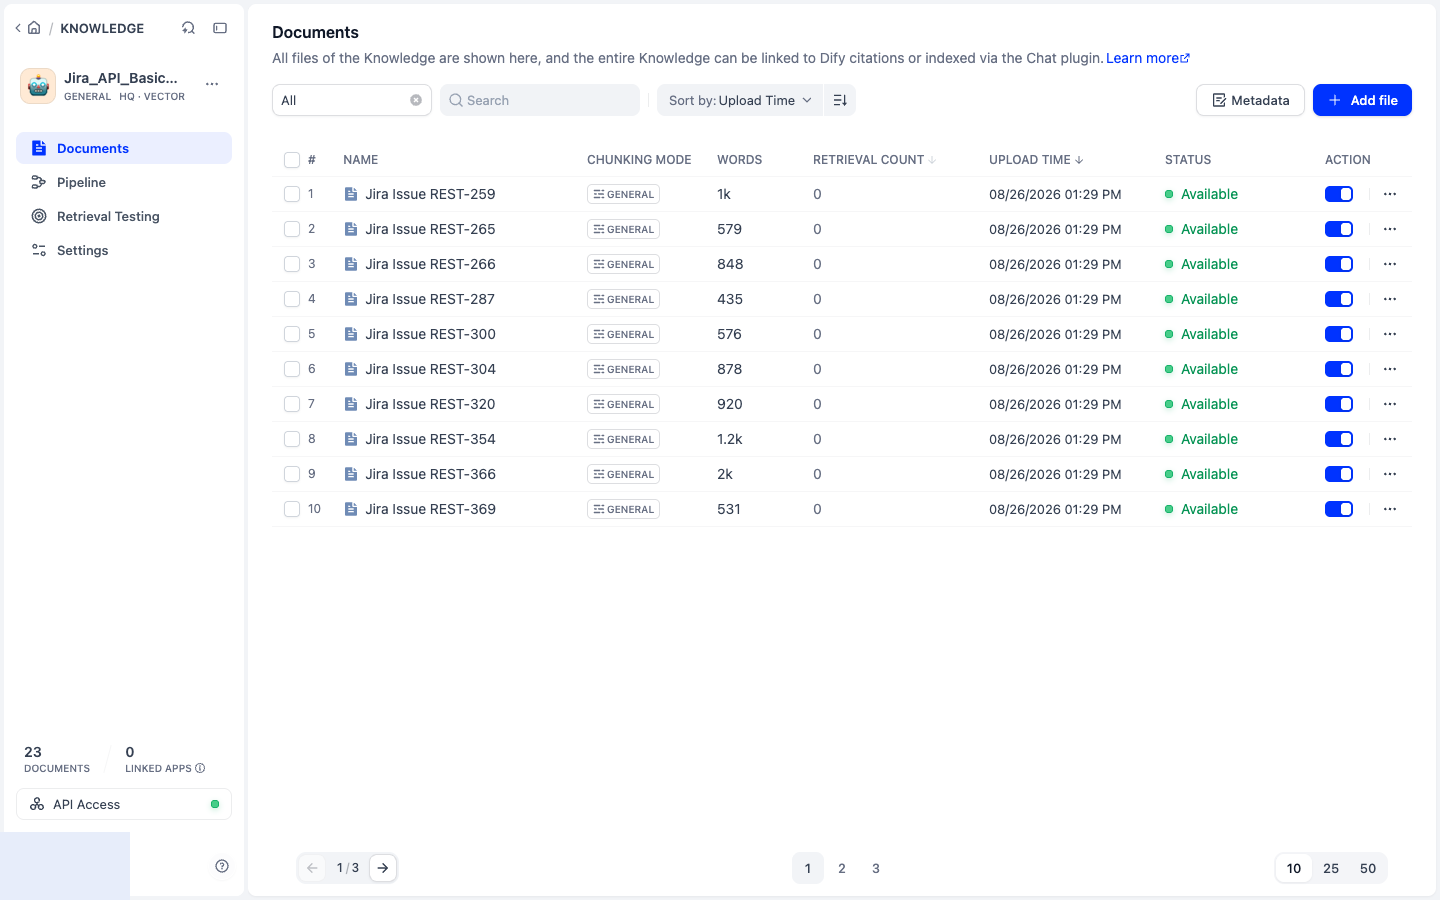
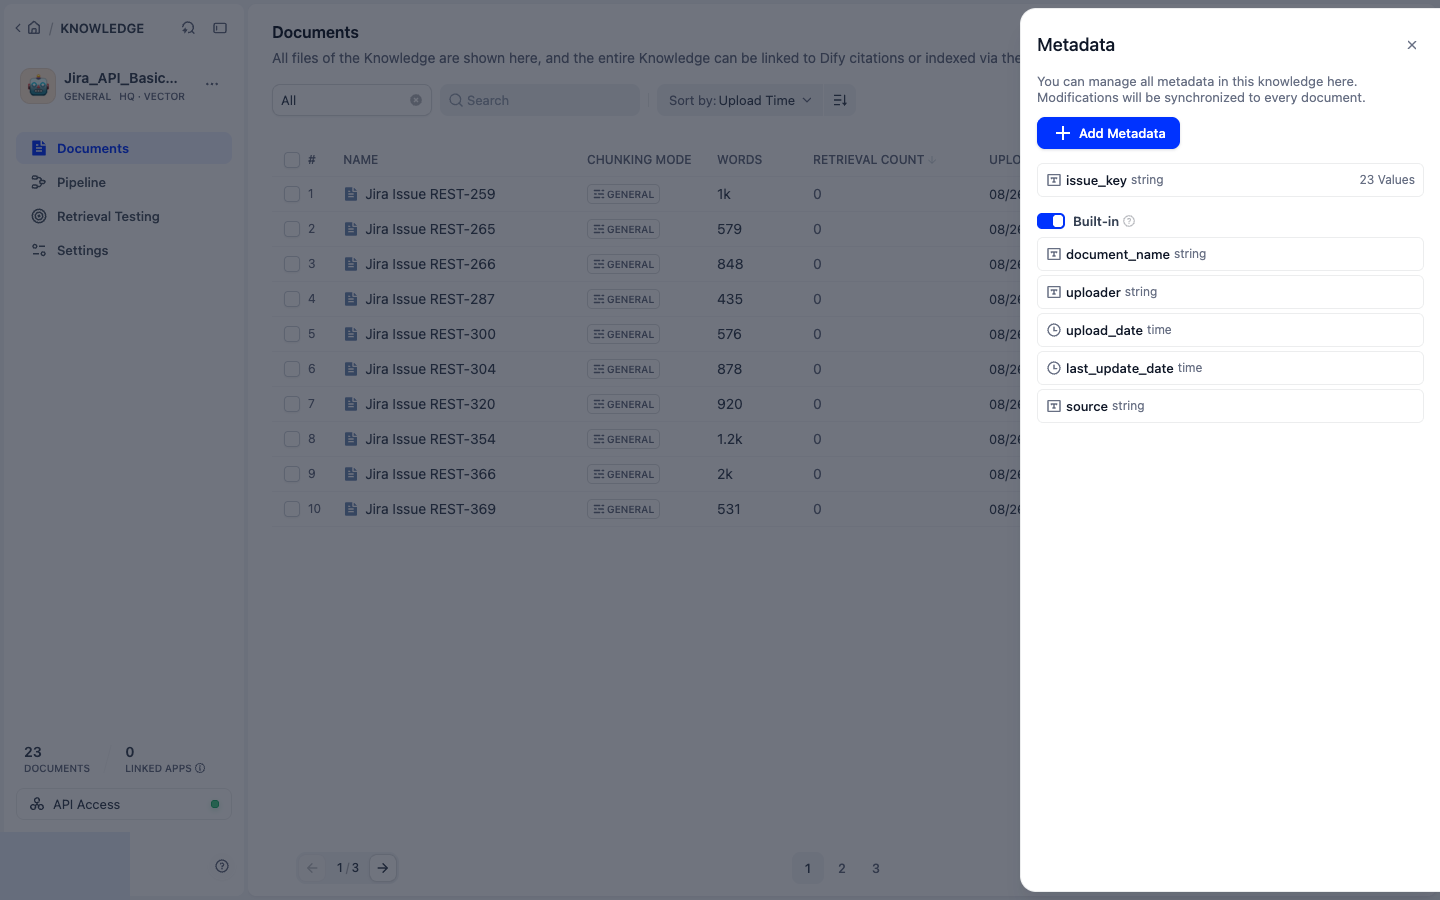
🎉 Success! Your Knowledge Base is Ready
Your Jira issues have been successfully ingested with structured metadata!
After the knowledge-base and retrieval checks pass, return to Dify's Knowledge API settings and revoke the short-lived key. Do not keep the key in workshop notes, terminal history, screenshots, or source control.
🧠 Step 5: Add Summary Index
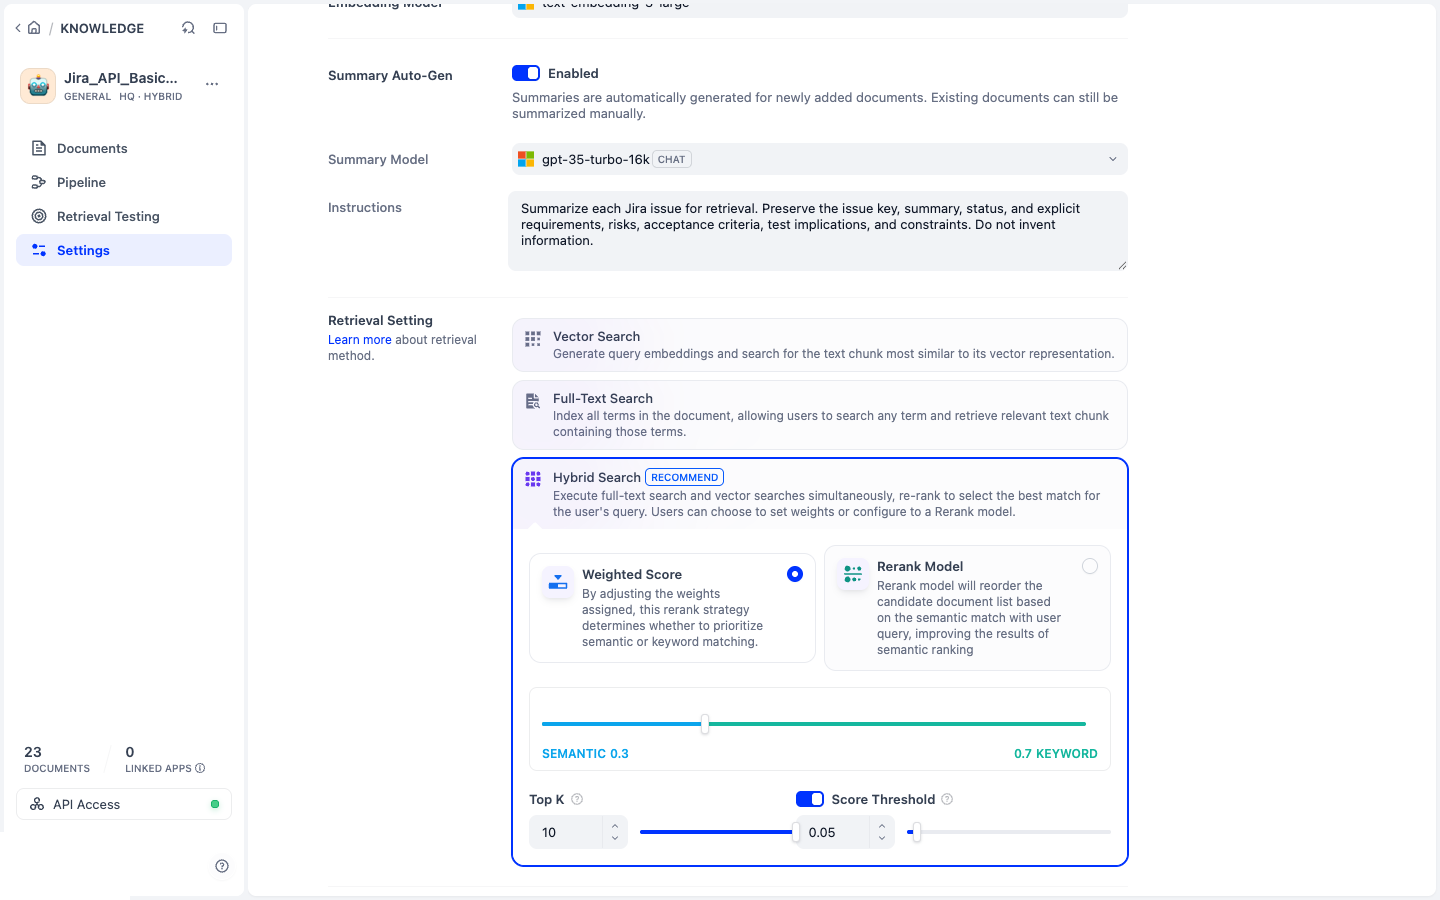
Dify's Summary Index generates a compact LLM summary for each chunk and embeds that summary as another retrieval surface. This can make requirements, risks, and test implications easier to find when the original Jira wording differs from the learner's question.
- Open the
Jira_API_Basic_*knowledge base and go to Settings. - Keep High Quality indexing and enable Summary Auto-Gen.
- Select
gpt-35-turbo-16k. - Instruct the model to preserve the Jira key, summary, status, requirements, risks, acceptance criteria, test implications, and constraints without inventing facts.
- Save the settings. Summary Auto-Gen applies to newly indexed content; for the 23 existing documents, select all documents and choose Generate summary.
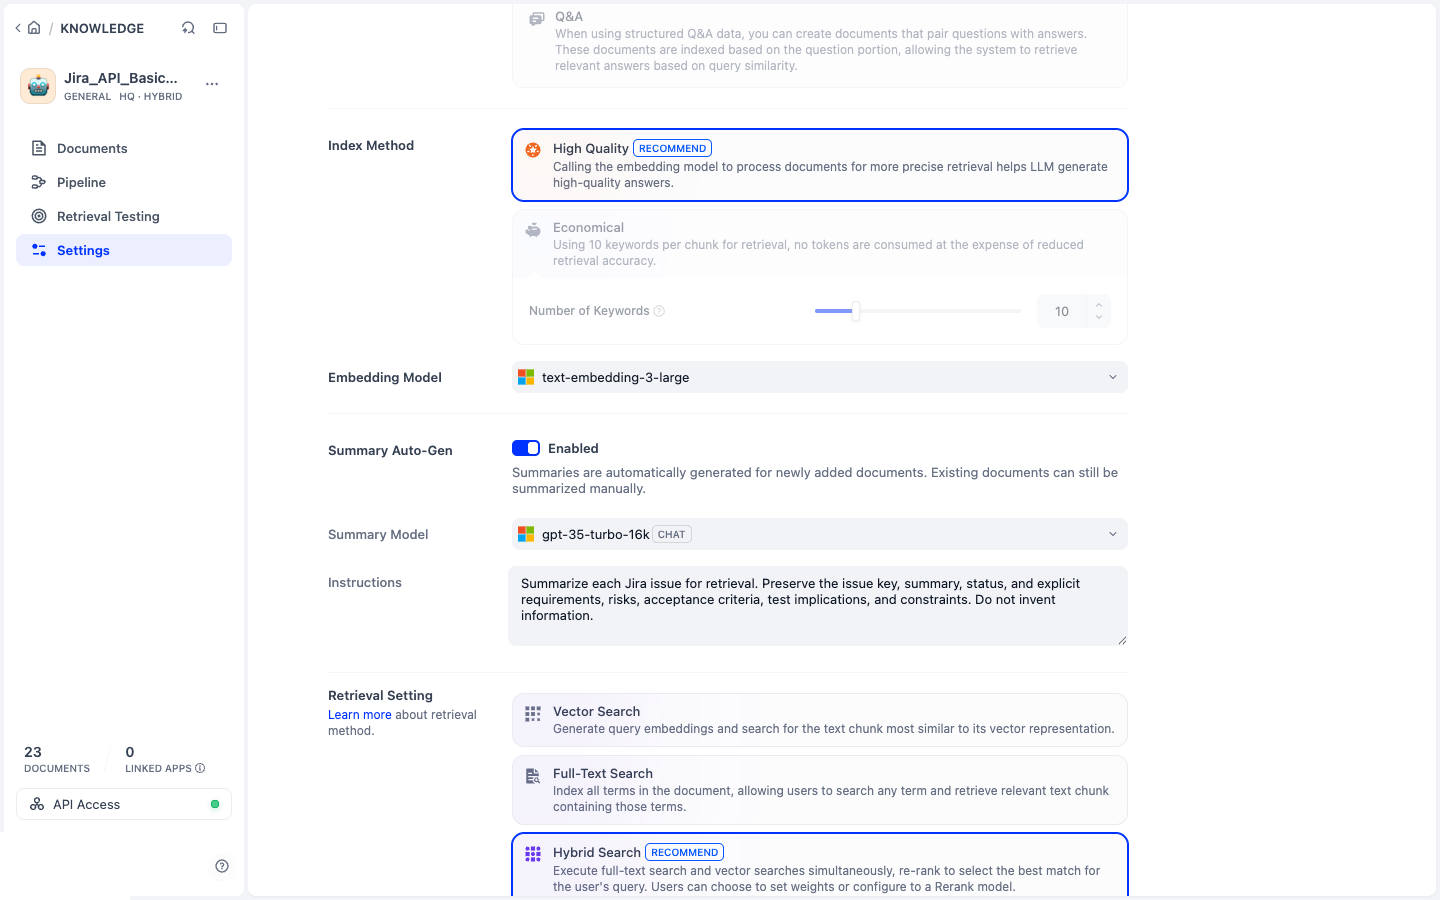
Inspect at least one generated summary before trusting it. For REST-266, confirm that the backward-compatibility constraint remains explicit. Generated test implications are useful retrieval hints, but they are model output, not new Jira requirements.
🎛️ Step 6: Tune and Benchmark Retrieval
Configure Hybrid Search with weighted retrieval:
- semantic weight:
0.3; - keyword weight:
0.7; - Top K:
10; and - score threshold:
0.05.
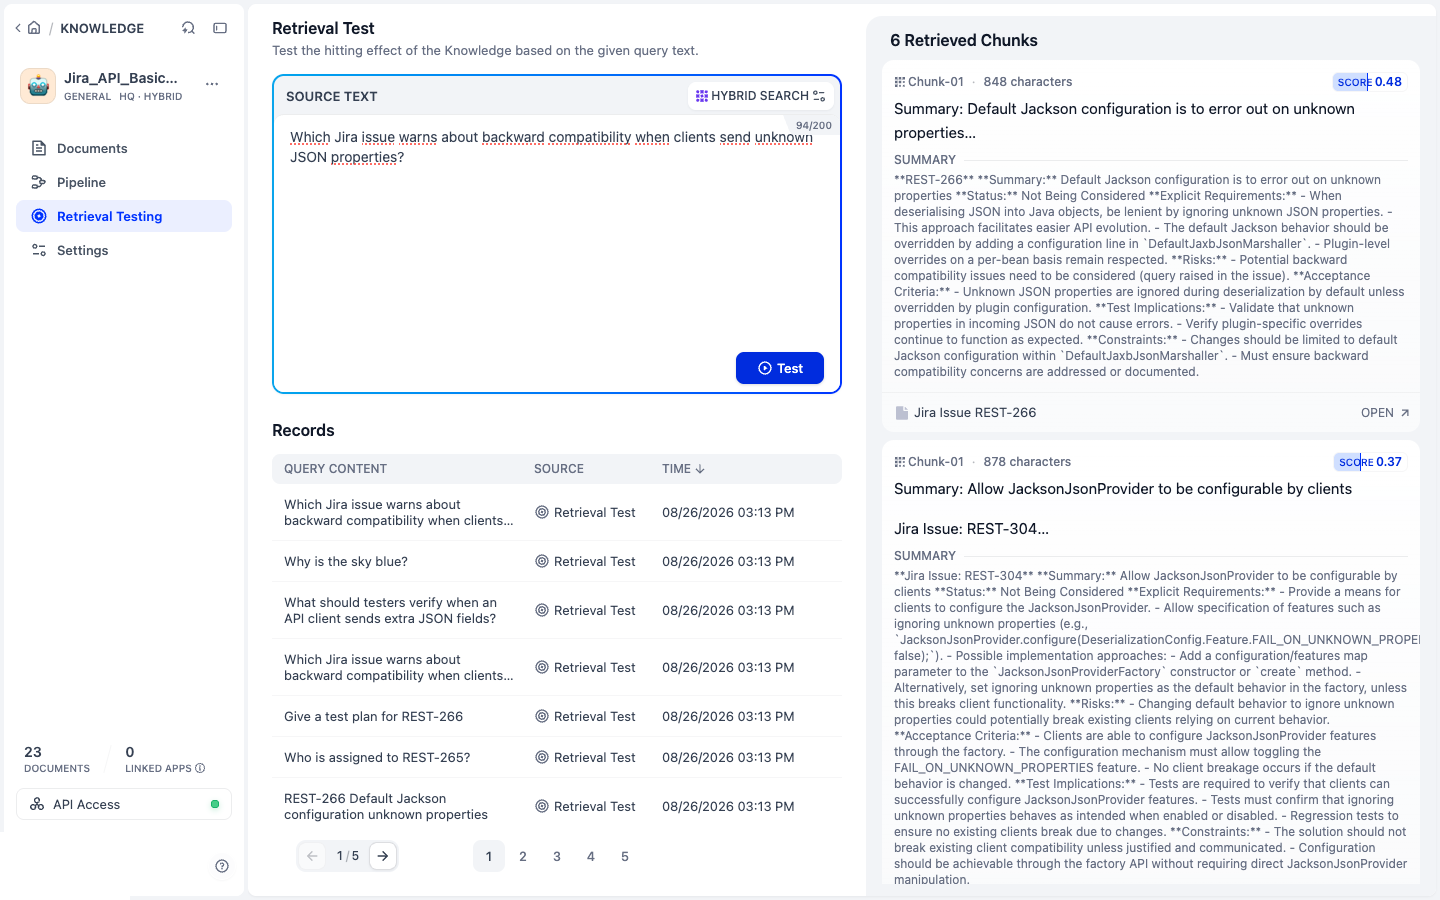
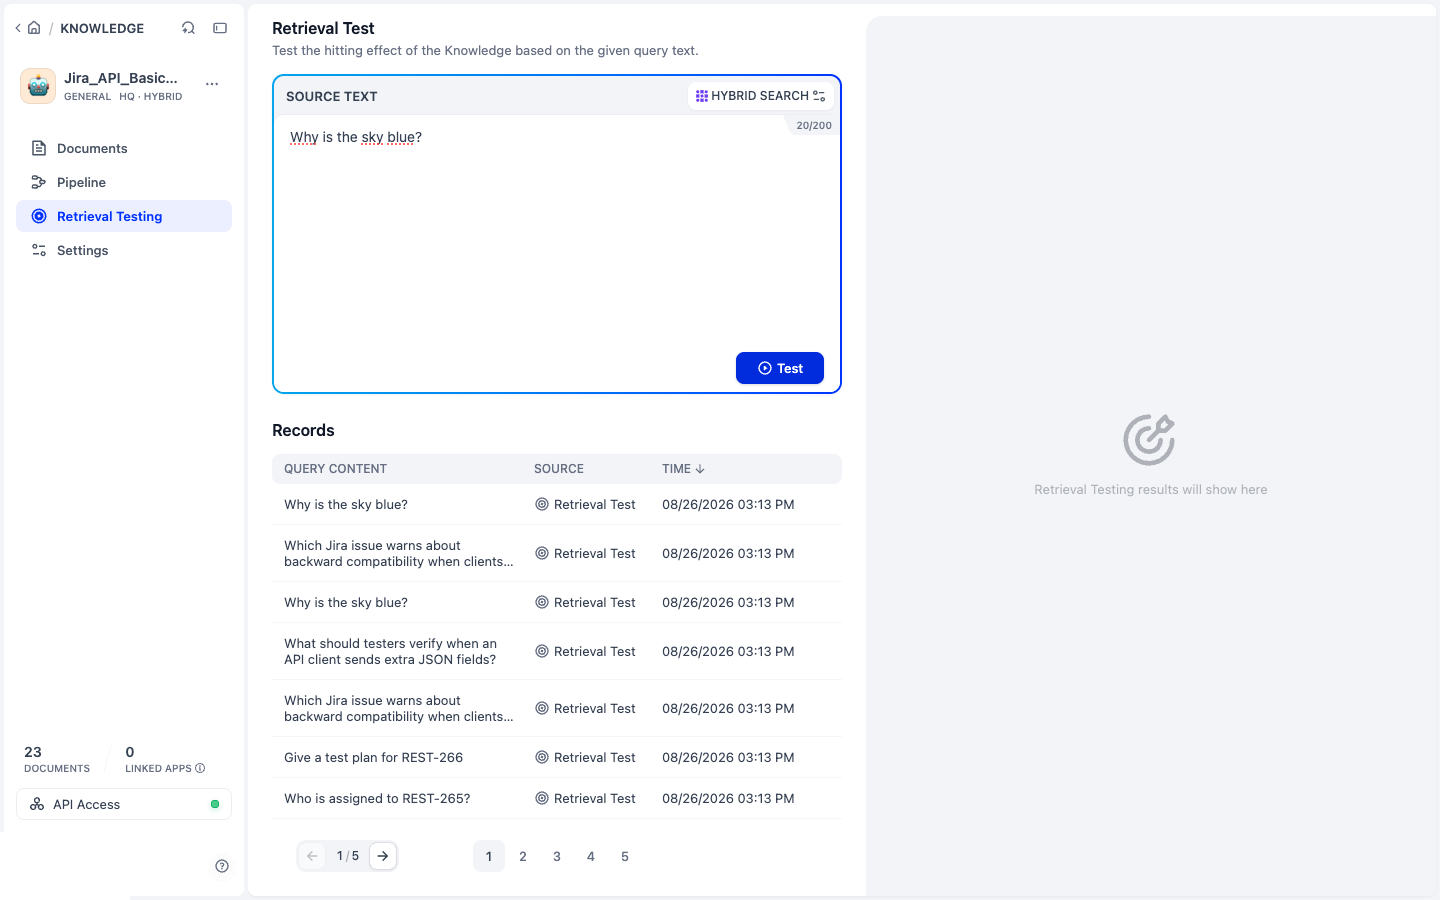
Run this fixed acceptance suite in Retrieval Testing before tuning further:
| Query | Expected evidence |
|---|---|
REST-266 Default Jackson configuration unknown properties | REST-266 at rank 1 |
Which issue creates a backward-compatibility risk when unknown JSON properties are accepted? | REST-266 at rank 1 |
Which Jira work has important test implications for REST API compatibility? | REST-266 in the top 3 |
Why is the sky blue? | No retrieved chunks |
Hybrid search does not replace metadata filtering. Conceptual Jira questions
benefit from summaries and semantic retrieval, while exact identifiers such as
REST-265 should be extracted and applied as an
issue_key filter. Exercise 3 establishes the grounded baseline;
Exercise 4 adds the extractor and exact-key retrieval paths.
📚 Step 7: Compare Knowledge Base Approaches
🔬 Understanding the Differences
You now have three knowledge bases in Dify:
📄 Manual Ingestion
From Exercise 2: .txt files uploaded by hand. Simple, but limited structure and no metadata.
🔧 Basic API Ingestion
Jira_API_Basic_* from Step 3: one document per issue, with metadata. Useful for simple lookups and basic retrieval.
🚀 Advanced API Ingestion
Jira_API_Advanced_* from Step 3.3: adds aliases and example queries. Better at matching different wordings of the same question.
- Manual: Raw text files, limited structure, no metadata
- Basic API: Structured data with metadata (issue keys, project info)
- Advanced API: Query seeding + aliases for better retrieval and understanding
- 👉
What is this issue about: Jira Issue: REST-259? - 👉
Give a test plan for REST-266 - 👉
Who is the assignee for REST-266? - 👉
Summarize the technical documentation for the REST module.
Record rank, source, score, and no-match behavior rather than judging only how plausible a result looks.
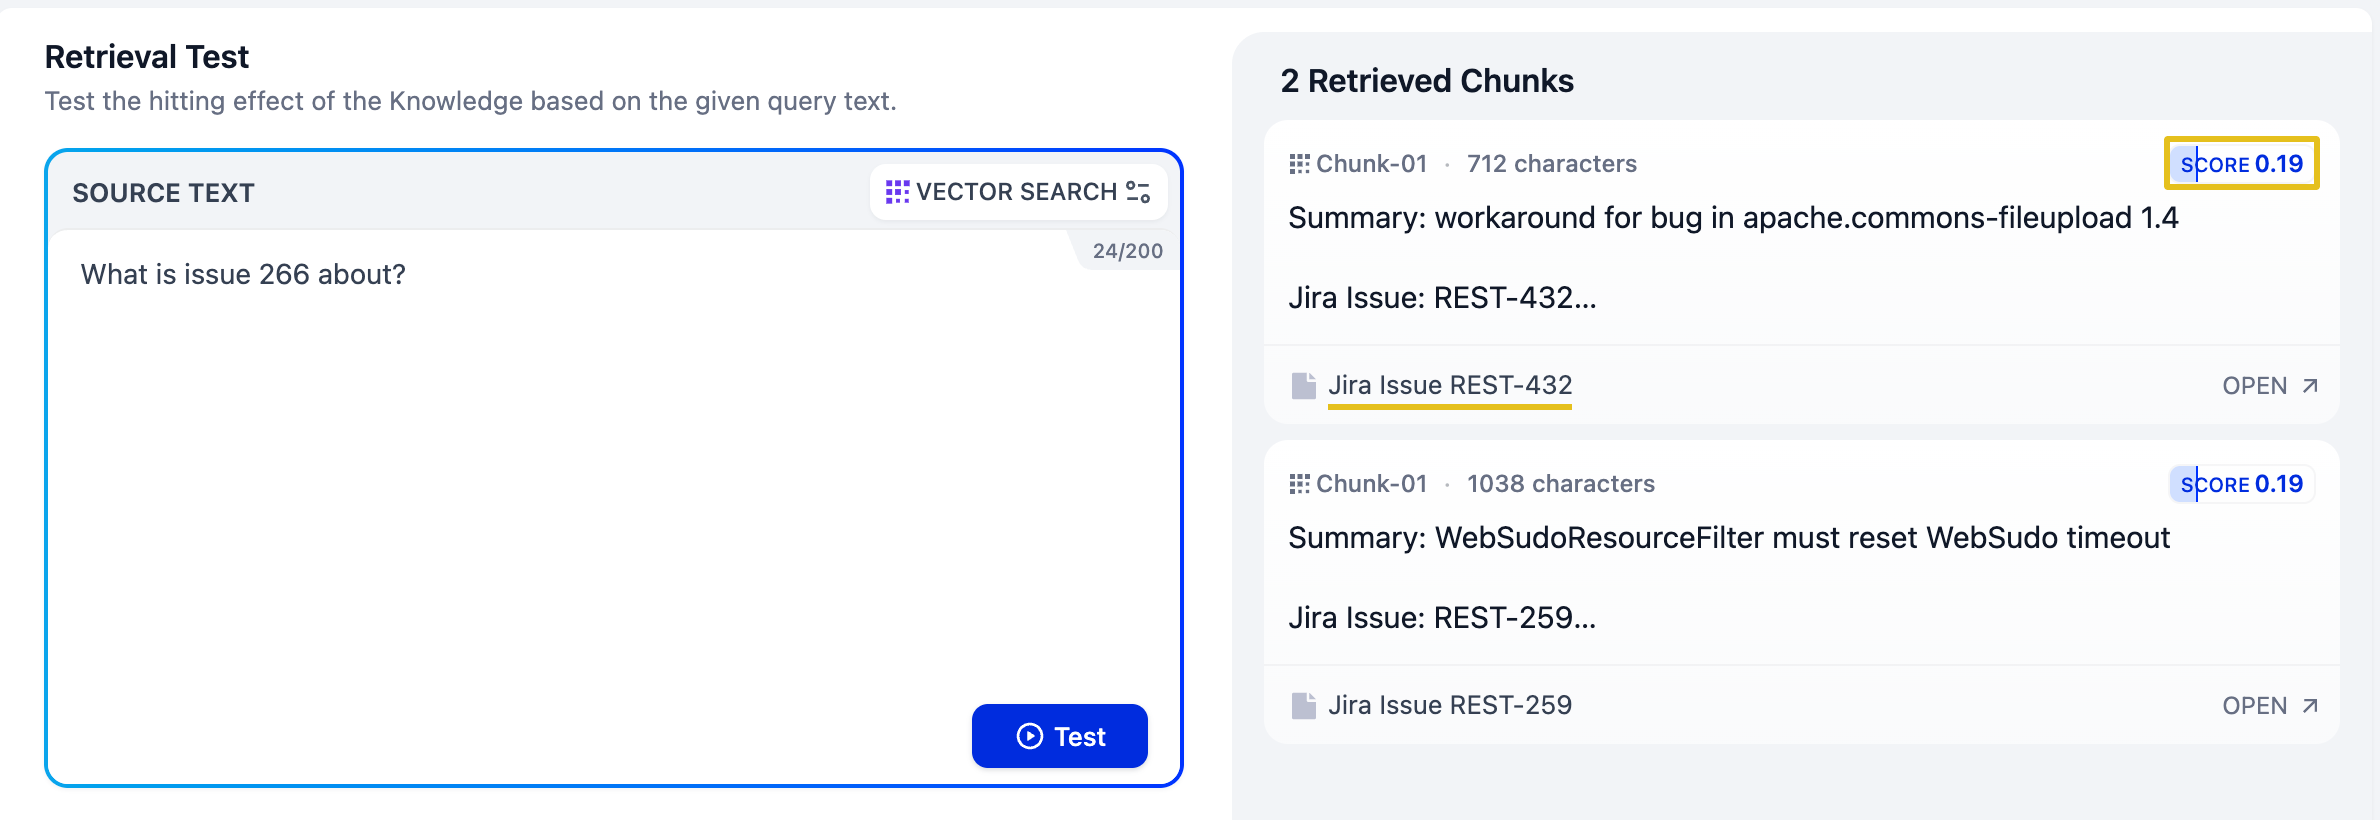
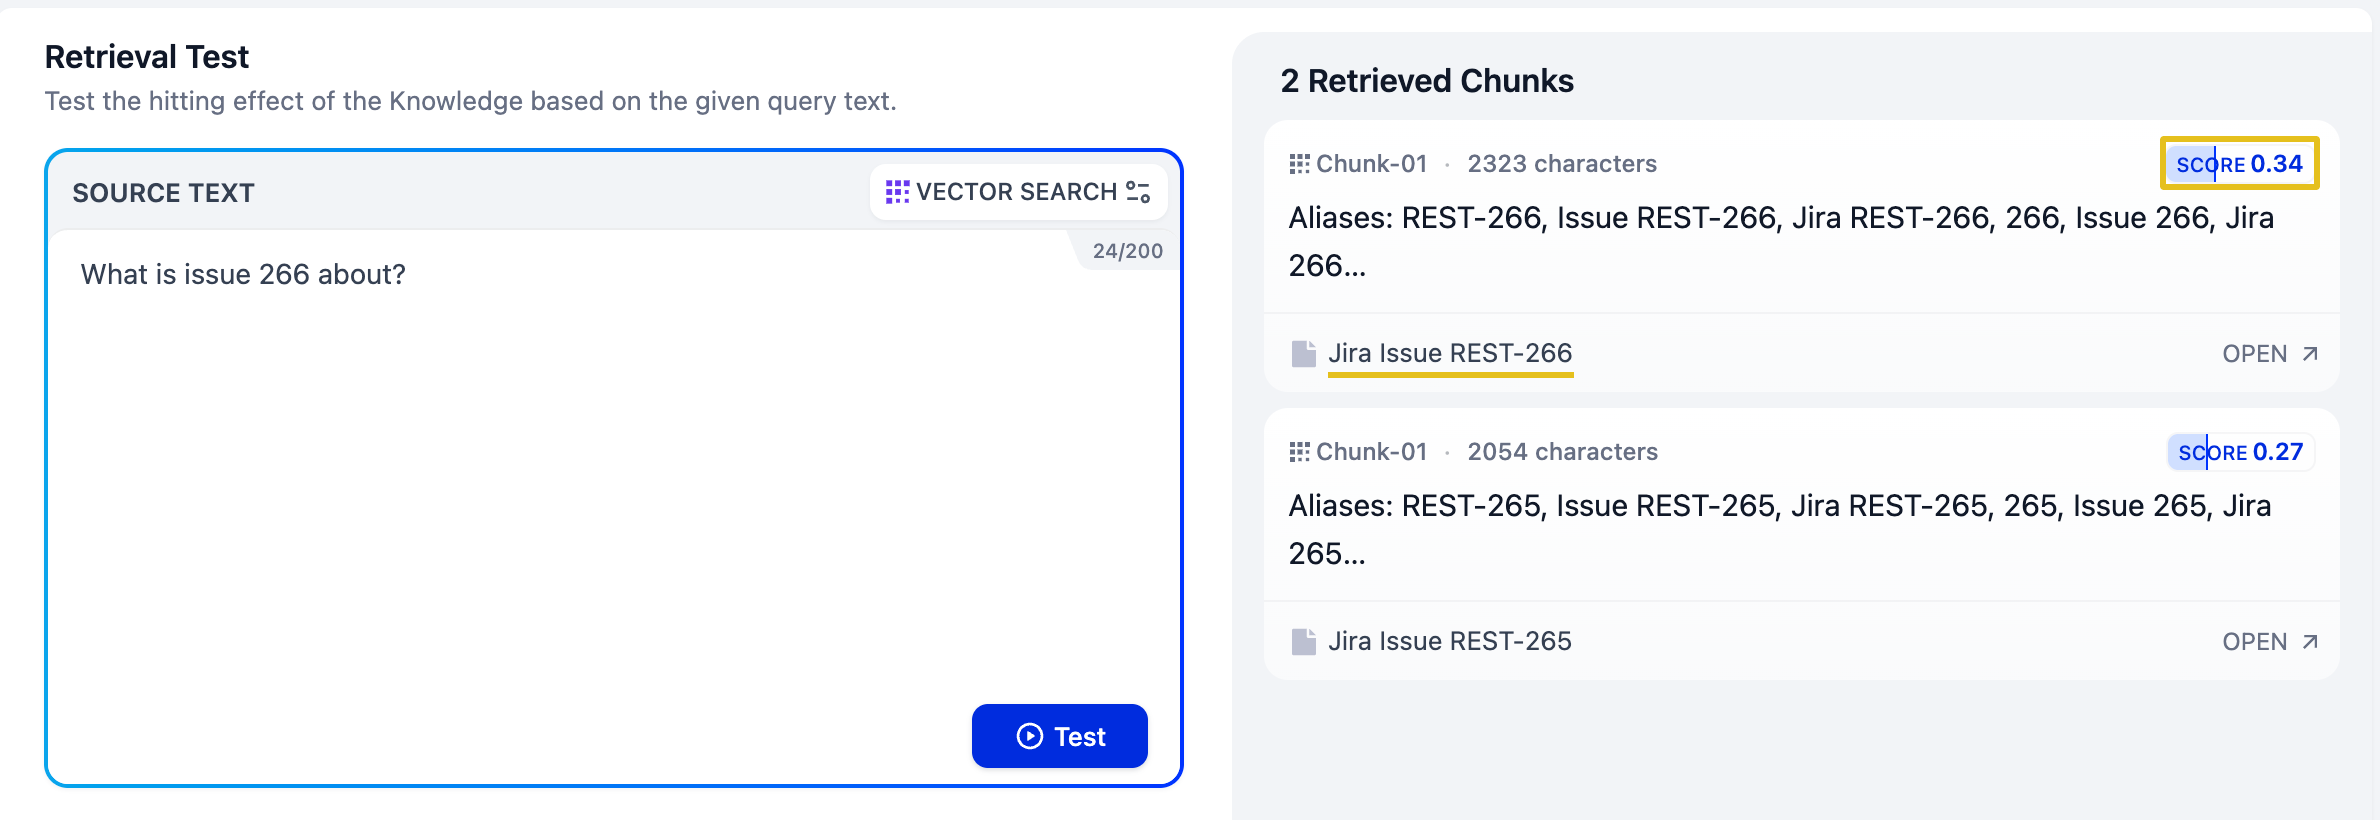
Here is What is issue 266 about? in Retrieval Testing on each knowledge base, with the default vector search:
📄 Manual: the top chunk is an unrelated slice of the .txt file. The words "issue 266" don't match anything meaningful.
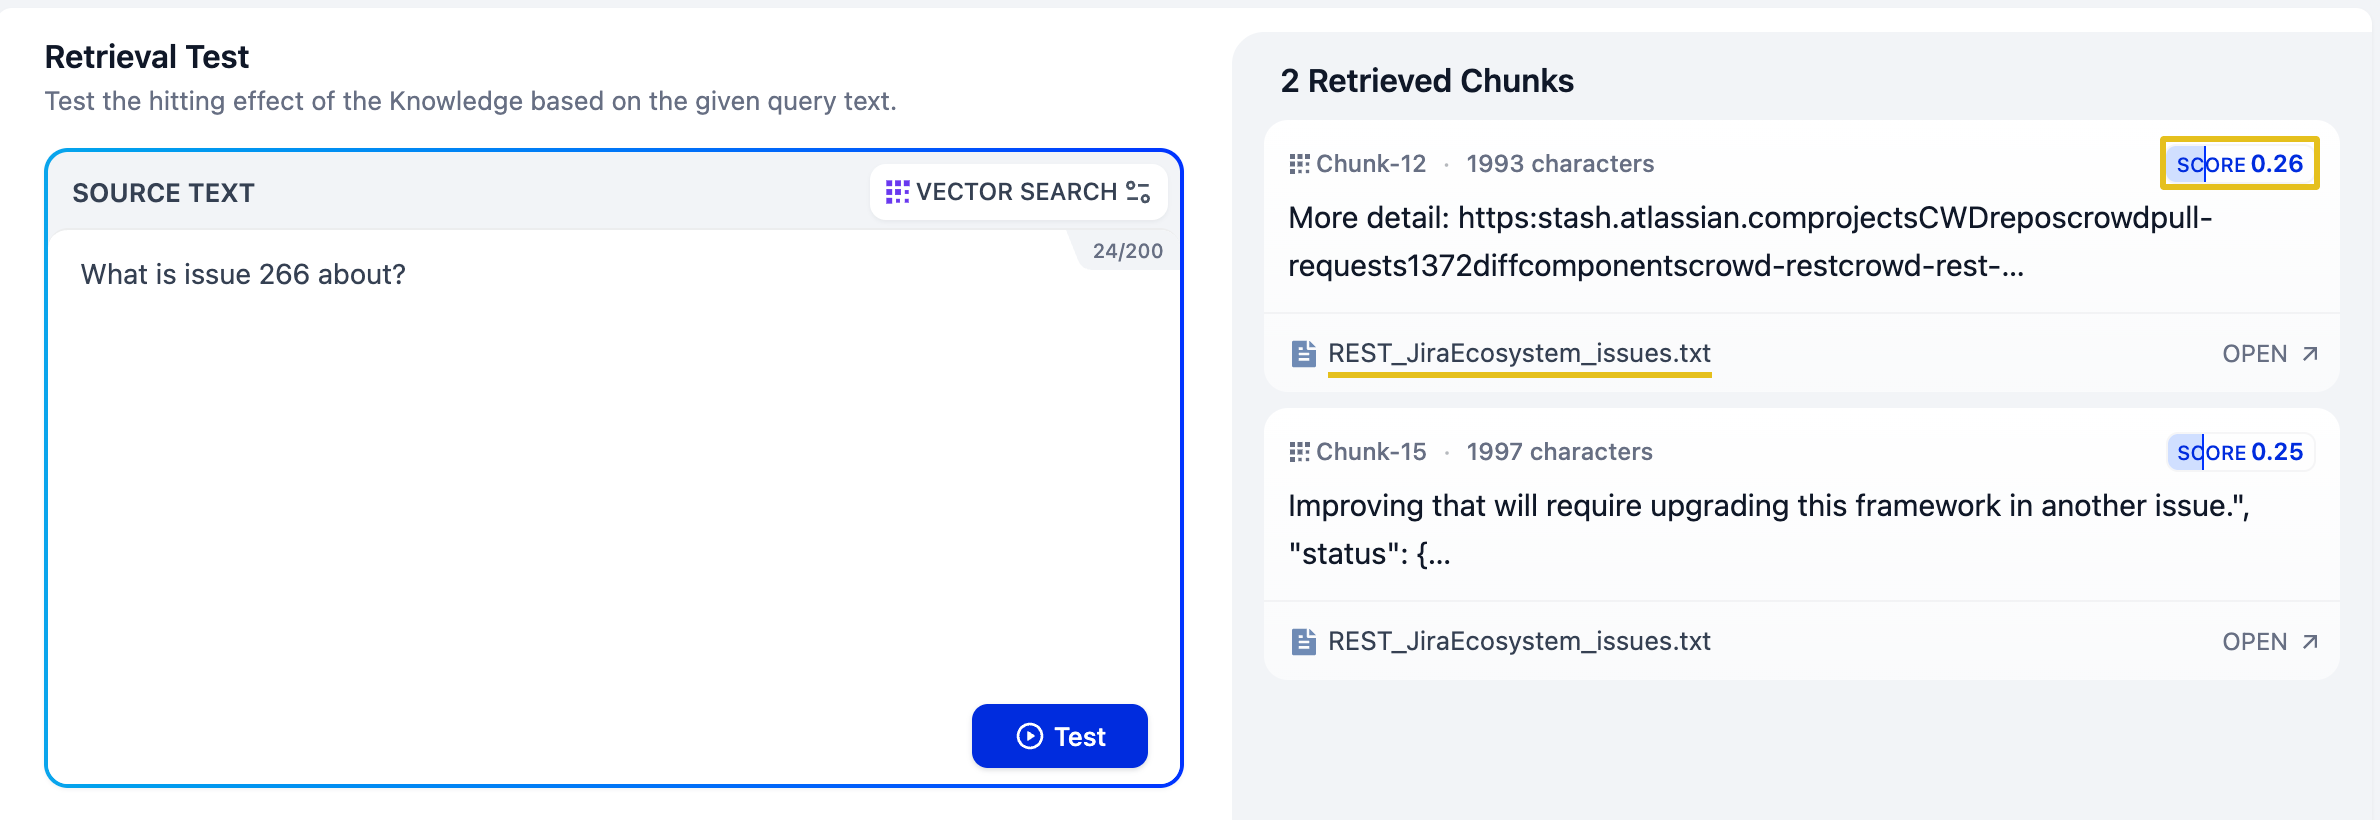
🔧 Basic API: each result is one clean Jira issue, but the top match is REST-432, the wrong one. The number 266 alone carries little meaning for the embedding.
🚀 Advanced API: REST-266 comes first. Its aliases (Issue 266, Jira 266) and example questions give the retriever the words users actually type.
🧠 Pro Tip: Open Retrieval Testing in each knowledge base and try the queries above. Compare the answers you get from each knowledge base. Structured data and advanced techniques enable smarter, more accurate answers!
🔍 What Happens Behind the Scenes?
🔬 Technical Details
When you ingest Jira issues via the API, here's what happens:
- Each issue is converted into a descriptive document with summary, description, project, type, etc.
- Smart chunking ensures readable chunks with overlap for better search coverage
- Metadata (like
issue_key) is attached to each chunk, improving traceability - Documents are vectorized and indexed in your Dify knowledge base
🔧 Advanced: Deploy Your Own API (Optional)
🚀 Deploy Your Own API Instance
If you want to deploy your own version of the API or understand how it works under the hood:
- Visit https://github.com/bassagap/dify_jira and create a Codespace on the main branch
- Follow the setup instructions to deploy your own instance
- This gives you full control over the API and allows customization
Note: This is optional and only needed if you want to customize the API or understand the implementation details.
🎯 Exercise Complete! What's Next?
🎉 Congratulations!
You've successfully ingested Jira issues using the API!
✅ What You've Accomplished:
- ✅ Connected to the Jira ingestion API
- ✅ Explored available projects using Swagger UI
- ✅ Ingested structured Jira issues with metadata, in basic and advanced mode
- ✅ Compared different knowledge base approaches
- ✅ Generated and reviewed Summary Index content
- ✅ Passed a fixed positive and no-match retrieval benchmark
🚀 Ready for the Next Challenge?
Your knowledge bases can find the right Jira issues. In Exercise 3, you'll connect one to a chatbot so it answers questions grounded in those issues.